Part 1/3
Challenge
Lors d’une de ses investigations, le ministère est tombé sur une mystérieuse clé USB. Les données disposées sur ce périphérique sont de forme inconnue.
Persuadé que ce système est disponible en open-source, il vous est demandé à vous, expert du renseignement en sources ouvertes et de l’analyse forensique, de mener une investigation.
Seriez-vous capable de retrouver le dépôt associé à ce système et de retrouver une première information confidentielle sur le périphérique ?
SHA256(dump.bin) 6d1476c3bd00856491455f3ab9eeed6da37383fc7f73a4343ce812e98f25a650 : 104857600 octets
Format du flag: SHLK{[a-zA-Z0-9_]}
Solution
dump.bin file identification
In this challenge we are given a dump.bin file. Our first goal is to analyze and identify its format.
$ file dump.bin
dump.bin: data
Nothing interesting comes out of the file utility. Let’s examine the strings contained in the dump.
$ strings dump.bin
sfkcolrehs
Watson's old device - CONFIDENTIAL
...
Interestingly, sfkcolrehs happens to be the mirror of sherlockfs. A quick search leads us to the following GitHub repo. As the name of the repo and the challenge description suggest it, dump.bin is a dump of an encrypted filesystem.
Identifying the vulnerability
Going through the GitHub repo teaches us that there is a utility named shlkfs.mount based on FUSE, whose purpose is to mount the filesystem.
In order to mount the encrypted filesystem we need a private RSA key that will be used to decrypt the filesystem content. However no key is provided… Let’s dive in the code.
After exploring the code we end up finding the structure of our filesystem.
// file: include/cryptfs.h
#define CRYPTFS_BLOCK_SIZE_BYTES 4096
/* ... */

struct CryptFS
{
    struct CryptFS_Header header; // BLOCK 0: Header
    struct CryptFS_KeySlot keys_storage[NB_ENCRYPTION_KEYS]; // BLOCK 1-64: Keys
    struct CryptFS_FAT first_fat; // BLOCK 65: First FAT
    struct CryptFS_Entry root_entry; // BLOCK 66: Root directory entry
    uint8_t
        padding[CRYPTFS_BLOCK_SIZE_BYTES
                - sizeof(struct CryptFS_Entry)]; // CryptFS_Entry unused space
    struct CryptFS_Directory
        root_directory; // BLOCK 67: Root directory directory
} __attribute__((packed, aligned(CRYPTFS_BLOCK_SIZE_BYTES)));
It seems that the filesystem is split into 4096-byte blocks.
Blocks 1 to 64 are used to stored encryption keys, let’s look at their format.
// file: include/cryptfs.h
struct CryptFS_KeySlot
{
    uint8_t occupied; // 1 if the slot is occupied, 0 if free
    uint8_t aes_key_ciphered[RSA_KEY_SIZE_BYTES]; // AES key ciphered with RSA
    uint8_t rsa_n[RSA_KEY_SIZE_BYTES]; // RSA public modulus 'n'
    uint32_t rsa_e; // RSA public exponent 'e'
} __attribute__((packed, aligned(CRYPTFS_BLOCK_SIZE_BYTES)));
So it look like the filesystem is encrypted with AES and that the AES key is itself encrypted with the user’s RSA private key.
After digging a bit in the commit history of the repo, looking for leaked RSA private key, we end up finding a script used to generate private keys.
Looking at the code we quickly see that the private key generation is flawed.
if __name__ == "__main__":
    key_size = 2048
    while True:
        p = generate_prime(key_size - 20)
        q = generate_prime(20)
        n = p * q

        if n.bit_length() == key_size:
            break
The private key is built using a factor of 20 bits only, because of that we can easily factor the RSA public modulus and thus recover the private key.
Private key recovery & mounting the filesystem
We recover the private key by factoring the RSA public modulus using the following python script.
from sympy import factorint
from Crypto.PublicKey import RSA

with open('dump.bin', 'rb') as f:
	f.seek(0x1000 + 0x100 + 1)  # Seek at the 'rsa_n' member of the first CryptFS_KeySlot struct
	n_modulus = int.from_bytes(f.read(0x100), 'big')
	e = int.from_bytes(f.read(4), 'little')

p, q = factorint(n_modulus).keys()

d = pow(e, -1, (p-1)*(q-1))
private_key = RSA.construct((n_modulus, e, d))

with open('private.pem', 'wb') as f:
	f.write(private_key.export_key())
The next step is to build the shlkfs.mount utility from sources. Gracefully authors of the challenge left a Dockerfile in the repository so that we can compile the project with ease.
Now that we compiled shlkfs.mount let’s mount the filesystem.
$ sudo mkdir /mnt/sherlock
$ sudo ./shlkfs.mount -k private.pem dump.bin /mnt/sherlock -f -s
[INFO]: Checking if the device 'dump.bin' is a SherlockFS device...
[ERROR]: Implementation not supported
[ERROR]: The device 'dump.bin' is not formatted. Please format it first.
Weird error, let’s look at the code again to understand why this error is raised.
// file: fs/filesystem/format.c
bool is_already_formatted(const char *device_path)
    /* ... */
    else if (header.version != CRYPTFS_VERSION)
    {
        print_error("Implementation not supported\n");
        return false;
    }
    /* ... */
}
So it seems that the code is looking at the version field in the filesystem dump header. We remember that the header is stored in the first block of 4096 bytes and is defined by the following structure.
// file: include/cryptfs.h
#define CRYPTFS_BOOT_SECTION_SIZE_BYTES 2048
#define CRYPTFS_MAGIC "sfkcolrehs" // reverse("sherlockfs")
#define CRYPTFS_MAGIC_SIZE (sizeof(CRYPTFS_MAGIC) - 1) // exclude '\0'
#define CRYPTFS_LABEL_SIZE 128 // reverse("sherlockfs")
#define CRYPTFS_VERSION 1
/* ... */

struct CryptFS_Header
{
    uint8_t boot[CRYPTFS_BOOT_SECTION_SIZE_BYTES]; // Reserved for boot code
                                                   // (bootloader, etc.)
    uint8_t magic[CRYPTFS_MAGIC_SIZE]; // Magic number
    uint16_t version; // CRYPTFS_VERSION
    uint32_t blocksize; // in bytes
    uint8_t label[CRYPTFS_LABEL_SIZE]; // Filesystem label
    uint64_t last_fat_block; // Last FAT block index
} __attribute__((packed, aligned(CRYPTFS_BLOCK_SIZE_BYTES)));
Let’s take a look at our dump version.
$ xxd -s 0x80a -l 0x2 -p dump.bin
dead
Look like authors wanted to trick us with a fake version value :) Let’s set this value back to its expected value (1).
$ printf '\x01\x00' | dd of=dump.bin bs=1 seek=$((0x80a)) count=2 conv=notrunc
We should now be able to mount the filesystem.
$ sudo ./shlkfs.mount -k private.pem dump.bin /mnt/sherlock -f -s
[INFO]: Checking if the device 'dump.bin' is a SherlockFS device...
[INFO]: Loading private key 'private.pem' from disk...
[INFO]: Extracting master key from the device...
[INFO]: Mounting a SherlockFS filesystem instance...
[SUCCESS]: SherlockFS filesystem mounted successfully!
Perfect ! We can now extract the flag from the mounted filesystem.
$ sudo ls /mnt/sherlock
flag1.txt

$ sudo cat /mnt/sherlock/flag1.txt
***************************************************************
*                                                             *
*                     WARNING - CONFIDENTIAL                  *
*                                                             *
*  This device is classified CONFIDENTIAL by the UK           *
*  Intelligence Service. Unauthorized access to this device   *
*  is strictly prohibited and will result in severe legal     *
*  consequences, including potential fines and imprisonment.  *
*  Access is limited to authorized personnel only.            *
*                                                             *
***************************************************************

The flag is: SHLK{m0un71n94cu570mf1135y573m15qu173fun}
Flag: SHLK{m0un71n94cu570mf1135y573m15qu173fun}
Part 2/3
Challenge
Vous, ancien agent double, avez eu dans le passé accès au périphérique de stockage dump2.bin d’un service de renseignement étranger. Or, les services secrets concernés s’en sont rendus compte et ont supprimé vos accès.
Vous vous souvenez cependant avoir effacé (proprement) un document PDF important sur ce même périphérique.
Trouvez un moyen, à l’aide du fichier dump2.bin ainsi que de votre ancienne clé privée my_private.pem, de retrouver vos accès au périphérique de stockage et de récupérer le document PDF effacé.
SHA256(dump2.bin) 146e74e46dc75385124a19f3a0013b05ef97687f245e18c66808f80d9bce1e7e : 104857600 octets
SHA256(my_private.pem) 0aeab3d6ade1c3488fceda108e205ff949dd58d32c5ab50697a722bcb213b4d3 : 1704 octets
Format du flag: SHLK{[a-z0-9]+}
Solution
Again we are given a dump of an encrypted filesystem, but this time we also have a private key. Let’s mount the filesystem.
$ sudo mkdir /mnt/sherlock
$ sudo ./shlkfs.mount -k my_private.pem dump2.bin /mnt/sherlock -f -s
[INFO]: Checking if the device 'dump2.bin' is a SherlockFS device...
[INFO]: Loading private key 'my_private.pem' from disk...
[ERROR]: The user with the private key 'my_private.pem' is not registred in the keys storage of the device 'dump2.bin'
Alright, so it look like the agent private key was deleted from the filesystem registered keys. But was it really …
Regaining access to the filesystem
First let’s recall how keys are stored.
// file: include/cryptfs.h
struct CryptFS_KeySlot
{
    uint8_t occupied; // 1 if the slot is occupied, 0 if free
    uint8_t aes_key_ciphered[RSA_KEY_SIZE_BYTES]; // AES key ciphered with RSA
    uint8_t rsa_n[RSA_KEY_SIZE_BYTES]; // RSA public modulus 'n'
    uint32_t rsa_e; // RSA public exponent 'e'
} __attribute__((packed, aligned(CRYPTFS_BLOCK_SIZE_BYTES)));
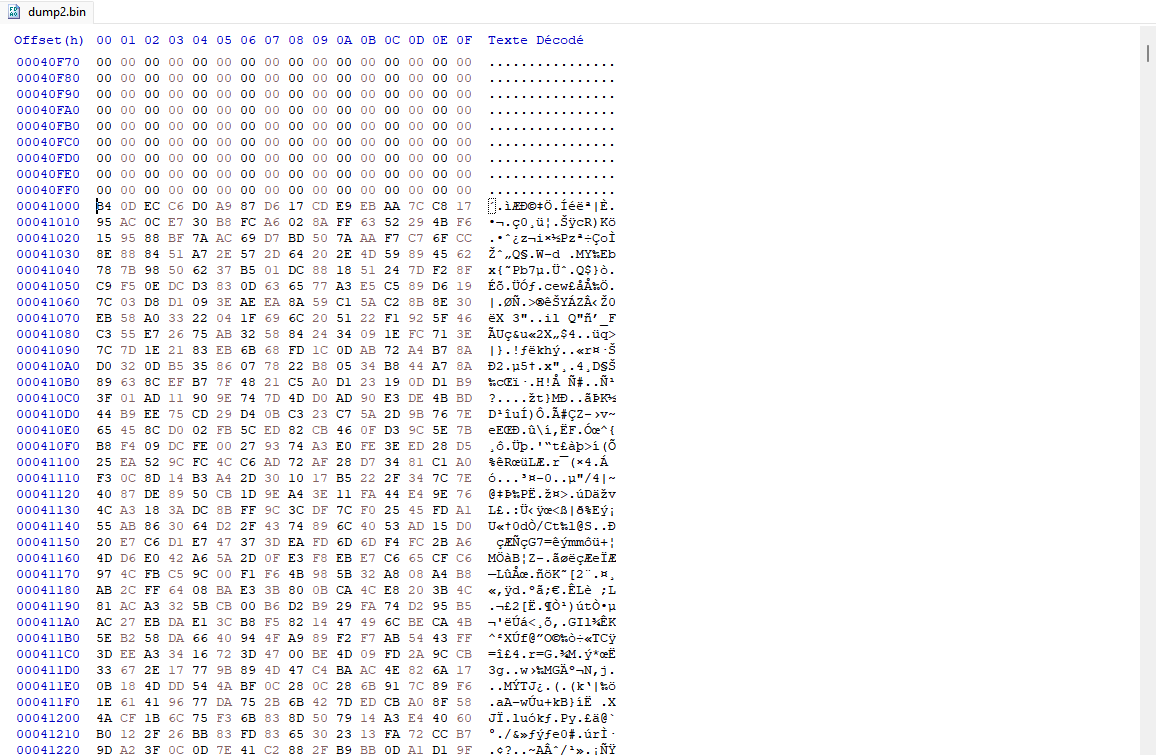
If we take a look at the second key slot block (offset 0x2000) we clearly see that a key was left there with theoccupied field set to 0.
$ xxd -s 0x2000 -l 0x201 dump2.bin
00002000: 00ab 4494 502d 1fb4 57bd b855 e663 c8a4  ..D.P-..W..U.c..
[...]
000021f0: cf5b 747b 4f91 8aad 1cd7 573f 3faf bf51  .[t{O.....W??..Q
00002200: f1
Let’s set this field back to 1 and mount the filesystem.
$ printf '\x01' | dd of=dump2.bin bs=1 seek=$((0x2000)) count=1 conv=notrunc
$ sudo ./shlkfs.mount -k my_private.pem dump2.bin /mnt/sherlock -f -s
[INFO]: Checking if the device 'dump2.bin' is a SherlockFS device...
[INFO]: Loading private key 'my_private.pem' from disk...
[INFO]: Extracting master key from the device...
[SUCCESS]: SherlockFS filesystem mounted successfully!
Nice, now we can explore the filesystem.
$ sudo ls /mnt/sherlock -la
total 4
drwxrwxrwx 1 root root    2 Jun  5 01:02 .
drwxr-xr-x 8 root root 4096 Jul  7 09:47 ..
-rwxrwxrwx 1 root root  304 Jun  5 01:02 .bash_history.bak
-rwxrwxrwx 1 root root  466 Jun  5 01:02 notice.txt

$ sudo cat /mnt/sherlock/.bash_history.bak
~/shlkfs_mount /dev/sdb -f -s /mnt
nano /mnt/notice.txt
vi /mnt/notice1.txt
vi /mnt/notice2.txt
vi /mnt/notice3.txt
vi /mnt/notice4.txt
vi /mnt/notice5.txt
rm /mnt/notice2.txt
rm /mnt/notice3.txt
cp ~/flag2.pdf /mnt/flag2.pdf
rm /mnt/flag2.pdf
rm /mnt/notice1.txt
rm /mnt/notice4.txt
rm /mnt/notice5.txt
The bash history reveals that the agent copied a flag2.pdf file to the filesystem prior deleting it. But was it really deleted …
Carving the “deleted” .pdf file
What we are going to do is a technique called file carving. In essence, this technique exploits the fact that certain filesystems do not truly delete data when a file is removed; instead, they merely remove the metadata, which renders the data inaccessible to the system.
// file: include/cryptfs.h
#define CRYPTFS_BLOCK_SIZE_BYTES 4096
/* ... */

struct CryptFS
{
    struct CryptFS_Header header; // BLOCK 0: Header
    struct CryptFS_KeySlot keys_storage[NB_ENCRYPTION_KEYS]; // BLOCK 1-64: Keys
    struct CryptFS_FAT first_fat; // BLOCK 65: First FAT
    struct CryptFS_Entry root_entry; // BLOCK 66: Root directory entry
    uint8_t
        padding[CRYPTFS_BLOCK_SIZE_BYTES
                - sizeof(struct CryptFS_Entry)]; // CryptFS_Entry unused space
    struct CryptFS_Directory
        root_directory; // BLOCK 67: Root directory directory
} __attribute__((packed, aligned(CRYPTFS_BLOCK_SIZE_BYTES)));
Looking at the source code we understand that files metadatas and their content are stored after the 64th block (offset 0x41000). By opening the dump in a hex editor we can see that there is encrypted data from 0x41000 to 0x54000 (19 blocks).
Before carving the pdf file we will need to decrypt the filesystem content. Looking at the code of the read_blocks_with_decryption function in fs/filesystem/block.c we understand that each block of 4096 bytes is decrypted by the following function.
// file: fs/security/crypto.c
const unsigned char iv[] = "SherlockFScrypto";

/* ... */
unsigned char *aes_decrypt_data(const unsigned char *aes_key,
                                const void *encrypted_data,
                                size_t encrypted_data_size,
                                size_t *decrypted_data_size)
{
    if (encrypted_data_size > INT_MAX)
        return NULL;

    // Setting up AES CTX
    EVP_CIPHER_CTX *ctx = EVP_CIPHER_CTX_new();
    if (ctx == NULL
        || EVP_DecryptInit_ex(ctx, EVP_aes_256_cbc(), NULL, aes_key, iv) != 1)
        internal_error_exit("Failed to initialize AES decryption\n",
                            EXIT_FAILURE);
    if (EVP_CIPHER_CTX_set_padding(ctx, 0) != 1)
        internal_error_exit("Failed to disable padding\n", EXIT_FAILURE);
    unsigned char *decrypted_data = xcalloc(1, encrypted_data_size);
    int decrypted_data_size_int;
    if (EVP_DecryptUpdate(ctx, decrypted_data, &decrypted_data_size_int,
                          encrypted_data, encrypted_data_size)
        != 1)
        internal_error_exit("Failed to decrypt data\n", EXIT_FAILURE);
    *decrypted_data_size = decrypted_data_size_int;

    EVP_CIPHER_CTX_free(ctx);
    return decrypted_data;
}
Each block is decrypted using AES 256-CBC with the IV SherlockFScrypto.
Now that we figured out how blocks were decrypted all we need to do is to figure out the AES key used by the filesystem, decrypt the 19 blocks and carve the .pdf file in the decrypted result.
Let’s first extract the AES key. To do so i did modify the source code to print the key after it was extracted.
// file: fs/security/crypto_device.c

unsigned char *extract_aes_key(const char *device_path,
                               const char *private_key_path, char *passphrase)
{
    /* ... */
    unsigned char *aes_key = rsa_decrypt_data(
        rsa_keypair, shlkfs->keys_storage[index].aes_key_ciphered,
        RSA_KEY_SIZE_BYTES, &extraction_size);

    printf("Decrypted aes key:\n");
    for (int i=0; i < AES_KEY_SIZE_BYTES; i++) {
        printf("%02x ", aes_key[i]);
    }
    /* ... */
}
After recompiling the project and running shlkfs.mount again, the AES key is displayed in the console log.
$ sudo ./shlkfs.mount -k my_private.pem dumptest.bin /mnt/sherlock -f -s
[...]
Decrypted aes key:
14 e9 b0 2c 8d ed 21 2e 70 9a 31 c4 bd c1 a8 ec 92 db 31 c6 98 a3 cb 33 d9 31 49 69 c4 3e 4d 18
[INFO]: Mounting a SherlockFS filesystem instance...
Then i wrote a python script that decrypt the 19 blocks of encrypted data.
from Crypto.Cipher import AES

iv = b'SherlockFScrypto'
key = bytes.fromhex('14 e9 b0 2c 8d ed 21 2e 70 9a 31 c4 bd c1 a8 ec 92 db 31 c6 98 a3 cb 33 d9 31 49 69 c4 3e 4d 18')
decrypted_output = b''

with open('dump2.bin', 'rb') as f:
	f.seek(65*0x1000)
	for _ in range(19):
		decoder = AES.new(key, AES.MODE_CBC, iv)
		cipher = f.read(0x1000)
		decrypted = decoder.decrypt(cipher)
		decrypted_output += decrypted

with open('decrypted_blocks.bin', 'wb') as f:
	f.write(decrypted_output)
Finally, by analyzing the decrypted blocks content with a hex editor i came up with the following python script that reassemble part of the .pdf file.
with open('decrypted_blocks.bin', 'rb') as f:
	data = f.read()

pdf = b''

pdf += data[0x7000:0x7000 + 0x1000]
pdf += data[0x8000:0x8000 + 0x1000]
pdf += data[0xB000:0xB000 + 0x1000]
pdf += data[0xC000:0xC000 + 0x1000]
pdf += data[0xD000:0xD000 + 0x1000]
pdf += data[0xE000:0xE000 + 0x1000]
pdf += data[0xF000:0xF000 + 0x1000]
pdf += data[0x10000:0x10000 + 0x1000]
pdf += data[0x11000:0x11000 + 0x1000]
pdf += data[0x12000:0x12000 + 0x282]

with open('flag2.pdf', 'wb') as f:
	f.write(pdf)
We can now open the carved .pdf and get the flag at the bottom of the document.
Flag: SHLK{f113c42v1n9c4n83p2377yh42d70d0m4nu411y}
Part 3/3
Challenge
Un incident récent a compromis un dispositif utilisé par un service de renseignement étranger, vous ayant permis de récupérer deux éléments essentiels : un dump du périphérique dump3.bin, ainsi qu’un dump de la mémoire du programme faisant tourner le système de ce périphérique.
Votre mission est d’analyser ces renseignements et de récupérer une notice sur le périphérique.
SHA256(dump3.bin) 384933be55464a40c869399bc1425ff022ab963c3f71cc991a7d02638ed836d5 : 104857600 octets
SHA256(mem.dmp) 5467688b27577ef028300cb6de4793330bba2471f1e45522f83537e996e49d2b : 2445528 octets
Solution
In this last challenge we are given another dump as well as a memory dump of a running shlkfs.mount instance.
$ file mem.dmp
mem.dmp: ELF 64-bit LSB core file, x86-64, version 1 (SYSV), SVR4-style, from '/workspace/SherlockFS/build/shlkfs_mount', real uid: 0, effective uid: 0, real gid: 0, effective gid: 0, execfn: '/workspace/SherlockFS/build/shlkfs_mount', platform: 'x86_64'
A quick look at the filesystem dump shows that only one key slot is used and that the RSA modulus cannot be factored easily. We thus come to the following conclusion: we will need to recover decryption keys from the memory dump.
Recovering decryption key from the memory dump
After searching for some basics strings related to RSA keys (such as -----BEGIN PRIVATE KEY-----) in the memory dump we did not find any interesting results. We will have to search for the AES key instead.
By opening the filesystem dump in a hex editor we notice that there are 7 blocks of encrypted data from 0x41000 to 0x48000.
The first idea that came to my mind was to try every possible consecutive block of 32 bytes of the memory dump as a key to decrypt theses 7 blocks. In order to validate if the key was the right one we simply decrypt the 7 blocks with it and search for 6 consecutive null bytes in the result. In fact first decrypted blocks contain a bunch of consecutive null bytes as they are made of file metadatas and padded with null bytes to fill the total 4096 bytes.
Here is the script.
from Crypto.Cipher import AES


KEY_SIZE = 32
IV = b'SherlockFScrypto'

with open('dump3.bin', 'rb') as f:
	f.seek(65*4096)

	encrypted_blocks = []
	for _ in range(7):
		encrypted_blocks.append(f.read(4096))

with open('mem.dmp', 'rb') as f:
	memdmp = f.read()

for key_index in range(len(memdmp) - KEY_SIZE):
	candidate_key = memdmp[key_index:key_index+KEY_SIZE]

	decrypted = b''.join([AES.new(candidate_key, AES.MODE_CBC, IV).decrypt(blocks) for blocks in encrypted_blocks])

	if bytes(6) in decrypted:
		print(f'[*] Found possible key at offset {key_index}, key={candidate_key.hex()}')
After waiting a few minutes it seems that the script does not find any possible encryption key. Look like we are missing something…
Decryption key obfuscation
By looking at the following snippet we understand that the AES key is not directly stored in the memory.
// file: fuse/fuse_ps_info.c
struct fs_ps_info
{
    bool master_key_set; // Whether the master key has been set
    unsigned char master_key[AES_KEY_SIZE_BYTES]; // XORed AES master key
    unsigned char xor_key[AES_KEY_SIZE_BYTES]; // master key XOR key
    unsigned char decoded_key[AES_KEY_SIZE_BYTES]; // Decoded key (must be
                                                   // zeroed after use)
} __attribute__((packed));
It’s rather the xored version of the key that is stored in memory. However the xor key is accessible right next to it so we can easily unxor it. Let’s adapt our previous script.
from Crypto.Cipher import AES


KEY_SIZE = 32
IV = b'SherlockFScrypto'

with open('dump3.bin', 'rb') as f:
	f.seek(65*4096)

	encrypted_blocks = []
	for _ in range(7):
		encrypted_blocks.append(f.read(4096))

with open('mem.dmp', 'rb') as f:
	memdmp = f.read()

for key_index in range(len(memdmp) - KEY_SIZE):
	candidate_key = bytes(memdmp[key_index + i] ^ memdmp[key_index + KEY_SIZE + i] for i in range(KEY_SIZE))

	decrypted = b''.join([AES.new(candidate_key, AES.MODE_CBC, IV).decrypt(blocks) for blocks in encrypted_blocks])

	if bytes(6) in decrypted:
		print(f'[*] Found possible key at offset {key_index}, key={candidate_key.hex()}')
$ python find_key.py
[*] Found possible key at offset 18985, key=7bef55bbd20d72584fecbc35d7e82ad14a39d5e25aef55bc82ea2f752b5da2c9
Bingo ! We found the decryption key. We now adapt the part 2 script to extract the 7 blocks with this key and search for the flag in the decrypted result.
$ python decrypt_blocks.py
$ strings decrypted_blocks.bin | grep SHLK{
                SHLK{7h32315n0345y1007w17hm3m02y134k49353cu217y}
Flag: SHLK{7h32315n0345y1007w17hm3m02y134k49353cu217y}